PLAN
PLAN
How to set up PLAN (Player Analytics)
Plan is an extremely popular & useful plugin that you can use to track server stats such as player counts, average playtime, and much more. You can check out the plugin here.
Installation Steps:
- For this to work you will need your own custom domain, such as domain.com. Go to your DNS page and set up a new CNAME record. Set the name to “plan” (you can also use anything else like “stats”, note that you will have to use that value instead of “plan” later on as well), and set the target to
revproxy-us.bloom.hostif your server is in the US orrevproxy-eu.bloom.hostif your server is in the EU. Also, make sure proxy status is set to “DNS only” so that the little cloud icon is gray instead of orange.
This guide will teach you how to set it up for the first time and how to secure it using the reverse proxy.

Example CNAME record using Cloudflare
- Go to your bloom panel, click on “Ports and Proxies”, and create a new Allocation with the port “8804”. Once you’re done with that, set the Reverse Proxy Domain to “revproxy-us.bloom.host” (or the EU one if you’re in the EU)

-
Install the Minecraft plugin from here and restart your server
-
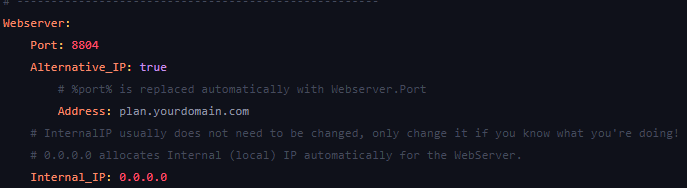
Open the plugin’s config.yml and change the following values:
- Webserver.Alternative_IP: true
- Webserver.Alternative_IP.Address: plan.YOURDOMAIN.com (obviously change it to your domain)
- Webserver.Security.SSL_certificate.KeyStore_path: proxy
-
If you would like to track players’ locations:
Data_gathering.Accept_GeoLite2_EULA
That’s it! You can now go to plan.YOURDOMAIN.com and click “Create Account” to make your account!